Birch Floral Robe

Let’s just gloss over the fact that I haven’t used this blog in literally years, and get straight to the point.

This robe. It’s a bit special, as it’s an example of extremely rare (for me) selfless sewing. I made it for my little sister for Christmas– I’ve been promising to sew her something for ages– and she seemed really happy with it.

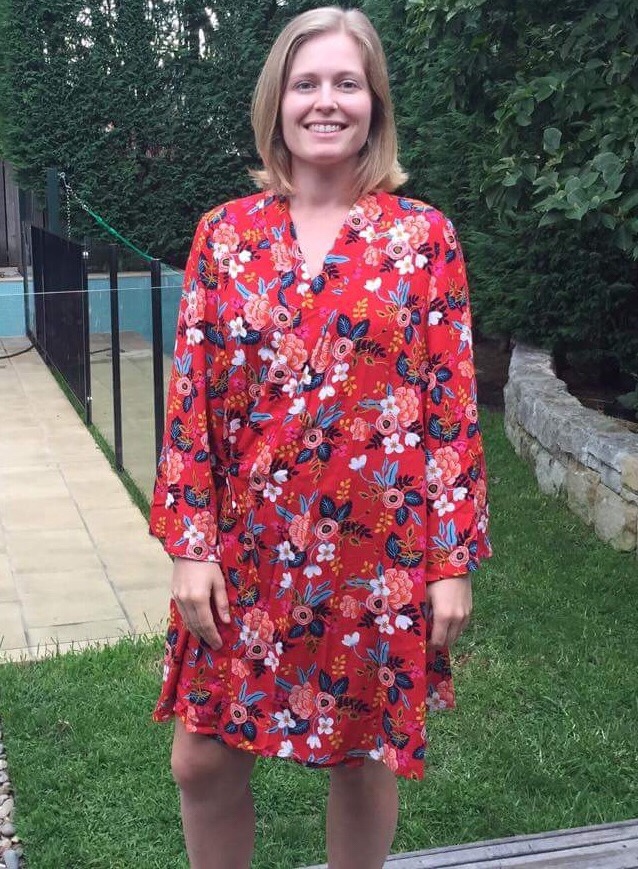
The pattern is M6659 from McCall’s Patterns, sewn up in lovely Rifle Paper Co rayon, printed by Cotton + Steel. The print is Birch Floral in Crimson, bought from fabric.com.

The fabric is everything I wanted it to be. Vivid color, lovely drape. Just perfect for a cool, summery robe. I wouldn’t hesitate to buy Cotton + Steel Rayon again, I can’t think how it could be any better. In fact, I’ve got three more cuts of the stuff in different prints, waiting to be turned into more robes.

The pattern was not everything I wanted it to be, although it got the job done.

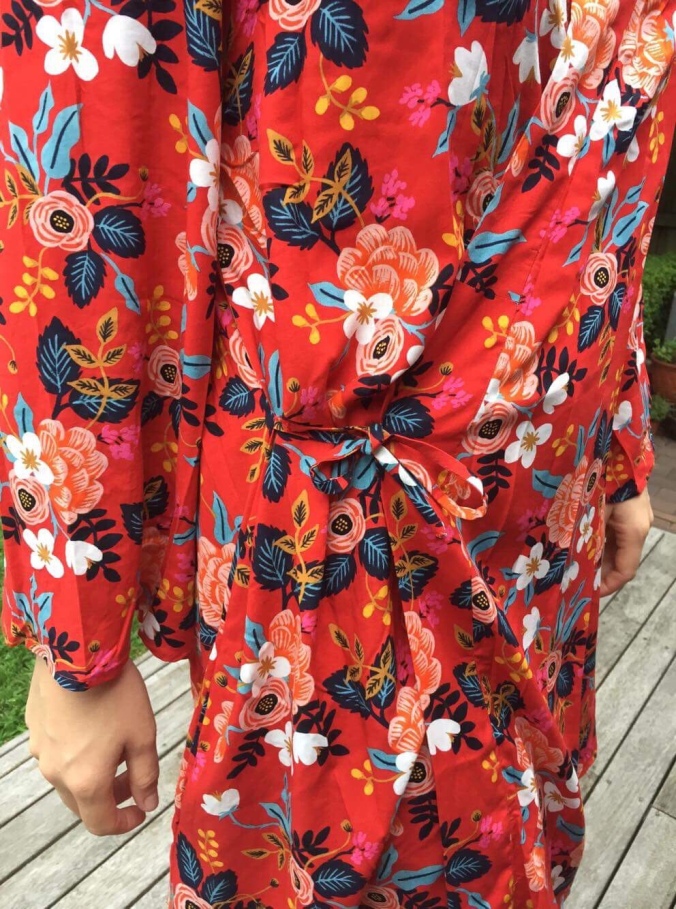
I modified it to add ties instead of a belt (much less prone to slipping open), a loop at the back neck for hanging on a hook, and pockets. It drives me nuts how many patterns don’t include pockets– why on earth would anyone want to go without them! It seems so simple for the designers to just include them, and saves the person sewing the hassle of figuring out where to place them. I firmly believe pockets should just be standard. I love all three of these modifications, and will definitely make sure that any robe I sew has them.

I also made some minor fit alterations. My sister is B37.5″, W30.3, H41.5″. The size 16 size chart measurements are 38-30-40, so I went with that. She was closer to a size 18 (42″) in the hips, but due to the loose fit there, it was fine. The only alterations I made were sleeve length and hem length– the sleeves were ridiculously long, while the robe itself was excessively short. I took off 2″ at the sleeve hems, and added 2″ to the robe length. My sister is quite tall, so I imagine that most people would need to shorten the sleeves. As for length, well, if you want to lounge comfortably without putting on a show, a bit of extra length is definitely a good idea! I did make the shorter variation of the robe, the longer variation is probably about mid calf length. On the pattern the short version is shown being worn over pajama pants, but I prefer to wear robes on their own. My sister has been wearing hers over her swimsuit, by the pool.

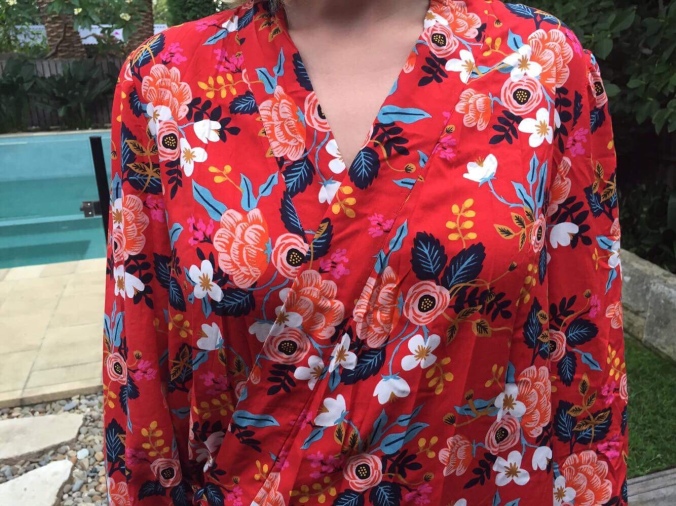
The biggest point of dissatisfaction I have about this pattern is that the armholes/upper sleeves are a bit tight. Tighter than you’d want for a casual robe (are formal robes a thing?). My sister has relatively slim arms, so it’s still definitely wearable, but it’s still slightly tighter than I’d like. I read this in the reviews before making the pattern, so seems i’m not the only one who has found this issue. If you make this pattern for someone whose arms aren’t relatively slim, keep in mind that you may need to do some alterations there.

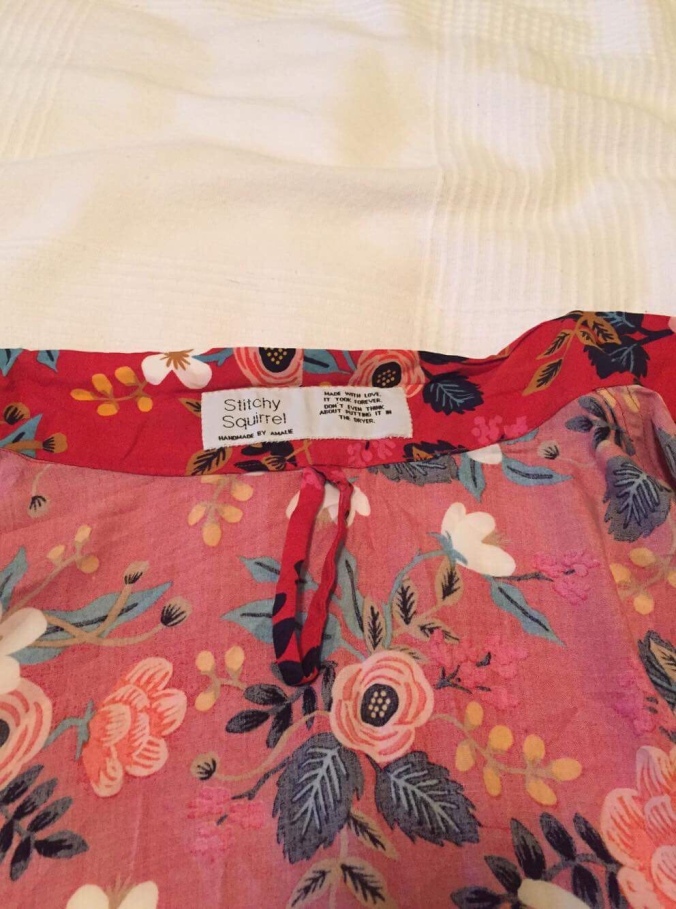
Another issue was that I was unable to fit all the pieces on my fabric. The pattern called for 4 3/8 yards of 45″ wide fabric, for both the robe and belt. I had 4 1/2 yards of 44″ wide fabric, and it wasn’t enough. I should have laid out the pieces according to the instructions, to see if that 1″ really made the difference– I kind of doubt it, but I didn’t check. The problem may have been that I lengthened the robe 2″, but I’m not sure. In the end, I had to cut each neck band in two pieces. The fanric is busy enough, fortunately, that the seam isn’t visible.

My next sewing project will be a robe for my mum. I’m worried about the sleeve/armhole fit, and I can’t be bothered to fuss with major alterations on something like this, so I’m planning to abandon ship on this pattern and try out the Suki Kimono pattern by Helen’s closet. It seems pretty popular, and I’m eager to compare. I think I’ll use that for a robe for myself, too– will post about how that goes.

Sound Circle Brumby


Megan Nielsen Brumby Skirt

Shirred back Brumby skirt


A while back, I made a loose waisted Brumby skirt/Staple dress mash-up. Since then, I’ve worn it a couple times (especially on airplanes), but I was always dissatisfied with it. I enjoyed sewing it, because I was trying something new, and I liked the concept and the comfort.

However, in practice the neckline was wonky, the split sleeves didn’t sit right, and it was just too much of a sack. I knew I had to do something with it, because I love the Nani Iro Sound Circle double gauze fabric. Originally I was going to try to alter it but keep it as a dress, but in the end I decided to just turn it into a Megan Nielsen Brumby Skirt.


There’s something different about this Brumby, however– it has a shirred/elastic back waistband!


the shirred back waistband

I’ve been wanting to try this for ages, but it took me a while to figure out how to actually do it. In the end, it worked out so well, and I’m so happy with it! I know this skirt will get a lot more wear than the original dress.


The stretchiness means it’s extremely comfortable, and will be absolutely perfect for travelling, because even if my weight fluctuates it’ll still fit. I’m definitely doing this hack on my next Brumby skirt– if anyone would like a tutorial to see how it’s done, let me know, because I will be making it soon 🙂


hammock tested 😀


Tote Bags


Two new bags, with one I made a while back in the middle.

I feel like tote bags are becoming my signature item. A month or so ago I made four of them, and then two days ago I finished another two. I’d started those last two before Christmas, and then left them in Australia. Now I’ve left Korea and I’m back home, so I could finally get them finished.

I absolutely love these tote bags, they’re so practical and sturdy, and leave a lot of room to play with prints. They also make great gifts. Of the eight tote bags I’ve made in total, only two of them were for me.

I won’t say too much about the construction, because I’ve already blogged about the first two I made (the leafy ones), and they’re pretty much exactly the same, except that the denim and cactus ones have slightly different dimensions. For those, they’re an inch narrower, and the base is an inch (half an inch?) shorter. The straps are also an inch shorter, because I’m a bit short and they were coming too close to dragging on the ground. I did the corners 3″ in along the bottom seams.

the pieces laid out for construction

The two denim ones are for some male friends of mine. I used dark denim for the base and straps, and a lighter denim for the main body. Both bags have classic caramel-coloured top stitching. All the fabric for these is from Dongdaemun Market in Seoul.

a peak at the tropical lining

Friend A is a great artist, and I made his in exchange for a drawing. He picked out the fabrics, including the lining, which I really love. The panel piece had six squares of different tropical prints– leaves, flowers, pineapples, flamingoes. For the internal pocket, I used a yellow zipper. I usually do Xs on the straps at the top of the body, for extra strength, but on one of them I did an A for his name. A little personalized detail which makes me smile. The total effect is perfect– the bag is fairly simple and masculine on the outside, and fun and flamboyant on the inside. Just like my friend! He’s really happy with it, and takes it everywhere– huge success.

Friend B’s bag is a bit simpler, with plain unbleached canvas for the lining. It also has a yellow zipper for a little splash of color. There’s a seam down the centre of one of the main body pieces, because I didn’t have enough fabric to do it in one piece. I thought it added a bit of interest, and emphasized it with top stitching.

the bag for Friend B

When Friend A said he wanted denim on denim for his bag, it made me think of Friend B, who was infamous in uni for rocking the “Canadian Tuxedo” look. I like making these bags in pairs, so it was pretty perfect to just make another with the same main fabrics. He doesn’t know he’s getting it yet (the chances of him reading this blog are very, very low)– I hope he likes it!

The next two I made using black 9 oz. duck canvas from fabric.com for the straps and base, and cactus print canvas from Miss Matatabi (sold out) for the main body. I made one for a close Korean friend who was so helpful to   Me while I lived there, and one for myself. They’re identical except that mine has a join on the back piece of one of the straps, because I was low on fabric. It’s not noticeable at all because it’s on the part that’s stitched down along the body. Plain unbleached canvas for the lining, and black for the zippers. My friend seemed happy with hers, and I’m very happy with mine– before, I constantly used my leafy tote, but now this is my go-to bag. The leafy tote was designed for my parents (Dad has completely taken over their one and uses it a lot!), this one feels more “me”.

with my recently made Papercut Patterns Clover blouse

The last two totes used 7 oz. hunter green duck canvas from fabric.com for the base, 9 oz. brown duck canvas for the straps, and “Robobear” printed canvas from Miss Matatabi (sold out) for the main body. Miss Matatabi really is my favourite source for printed canvas. The lining is also unbleached canvas from the market in Seoul. These two are for my parents, to take to our family holiday house–named Bear Camp– in the California redwood forest. These were meant to be Christmas presents, but better late than never!

Our cat Bitey approves.


Monochromatic Clover

Papercut Patterns Clover Blouse

Papercut Patterns Clover Blouse

Hello!

Today I’m sharing my version of the Papercut Patterns Clover Blouse, the second most recent thing I’ve sewn. I just finished it two days ago, although I’ve actually been doing quite a lot of sewing lately, and there are some other projects I’ve yet to blog (or put finishing touches on).

I really didn’t think I would love this blouse as much as I do, but it turned out a lot better than expected. I was actually resenting it a little before the fabric was even cut, because I’d made a few weak fitting attempts a few months ago before chucking it aside. I’m so glad I decided to give it another go.

The main fabric is a viscose rayon from Dongdaemun Market in Seoul. I say that as if I know what I’m talking about, but I don’t really, I’m just guessing that’s what it is because it feels a lot like a viscose in my stash. Dongdaemun market is absolutely amazing for this type of fabric, the top floor of one of the buildings has a couple stalls with a lot of different prints, all for about US $3 a yard. I’m leaving Korea for good in a week, but I’m seriously considering heading to Dongdaemun to stock up some more– cheaper to buy it here and ship it home than to buy it on Australia!

The fabric behaved pretty well, I had heard that sewing with rayon is difficult but it seems that the things I fear most in sewing always turn out to be not that difficult after all (ahem, buttonholes.) I had to slow down, be a bit more careful, use some extra pins, but it really wasn’t that bad. It left me feeling confident about sewing with rayon (…and then my next project with rayon challis totally dashed that confidence. Rayon challis is officially on my bitch list. But that is a story for another day). The bust inset is made with aforementioned rayon challis, but those pieces are small so didn’t cause excessive grief.

In terms of construction, things didn’t go completely smoothly. Because I just can’t resist making things harder for myself (and really, because boobs), I did a full bust adjustment. This is what was behind those two unsuccessful muslins a few months ago.

Random slightly related note: why does my smartphone still correct muslins to Muslims? I feel like if it’s so smart it should have picked up that I don’t spend all my time making Muslims… Wouldn’t even know where to start.


I originally made a size XL muslin but I didn’t like the fit around the shoulders, so I used a size L with a 2″ fba (for a total of 4″ added). According to the chart, size L is for a 41 1/2″ chest and 34″ waist. I’m currently more like 47″ and 35″, but there’s a lot of ease so with the FBA there was plenty of chest room. It was the right amount to add but I had to guess at where the apex would be. I guessed wrong, and my darts ended up pointing down to imaginary tits which are far saggier than mine. At least the shoulder fit was really improved so I knew I was on the right track.

This time, I redid the FBA with a different bust point, and then split the rather chunky dart that resulted into two smaller darts. Remember what I said about making things difficult for myself? Yeah. Took a no-dart bodice and turned it into a 4-dart bodice. Typical.

When I made it up, I realized the dart tips were far too close together, causing some puffiness at the points. I extended the darts longer, and that helped. They’re still a bit long, and not as smooth as I’d like, but thanks to the print it’s not very noticeable. Next version, the dart points will be further apart! They should also probably be a bit lower, went a bit too far in moving them up.


Detail of bust inset, before neck binding

There WAS one major drama involved in constructing this top– that infamous bust inset. I’d read online everywhere, and experienced with my muslin, that it’s too long. I thought I would just line it up from the outside in, and trim it off at the centre front– this did not work out at all. After a very frustrating hour of trying to pick tiny and nearly invisible stitches out of the rayon, and stretching it out of place, I admitted defeat and ended up re-cutting the entire front.

My advice to anyone making this top is to very carefully pin the bust inset to the other front pieces outwards starting from the centre front. Also, be careful to align along the stitch line, not the cut edges. Mark the stitch line in with a pen or chalk, or do lines of stitching as a guide if your fabric is robust enough, to help you line them up. It bugs me to no end that the inset point wasn’t trimmed off on the pattern pieces so you could simply line it up with the cut edge. (Does anyone know why some designers don’t do this– is there any advantage to it?) After your pieces are stitched together, if the inset is too long, you can simply trim it off along the shoulder edge.


The bust inset came up longer on one side than the other, because I used a line of stitching on one of the black pieces as a guide, and it gathered the fabric up slightly. Once everything was sewed together, I trimmed off the excess at the outer edges.

 
Tl;dr: pin from the centre front outwards, NOT from the shoulder edge inwards, then trim the excess.

Anyways, once I’d moved past the trauma with the bust-insets, things went pretty smoothly. I didn’t follow the hemming instructions, but instead zigzagged the raw edges, ran a long of stitching 1cm from the edges as a guide, and folded it along that line and then again to totally enclose the raw edges. I think it’s neater than just turning it up once, as the instructions would have you do.

I mostly made this top as a trial to see whether the bust inset would sit too low on me to do it in lace (it doesn’t!). In the end, I  love this top– I love the curved side seams, and how the rayon drapes perfectly. The top may be loose around the waist, but it’s not a tent. Rayon is really the perfect fabric for this pattern. I

‘m so happy with this top that I’ve already gone ahead and made myself another, which I finished this morning– will blog it as soon as I can get some good pics!

Sound Circle Staple Brumby

Megan Nielsen Brumby skirt and April Rhodes Staple dress hack

Took these pictures while visiting home in Sydney…now back in freezing Korea, and dreaming of sunnier times!

This dress is a mix of the April Rhodes Staple Dress and the Megan Nielsen Brumby Skirt. I made it from Nani Iro double gauze (the print name is “Sound Circle”) which I bought from my favourite online fabric store, Miss Matatabi.

I absolutely love the Brumby Skirt (those pockets!), and I’ve been wanting to use it in a dress. Originally, I had planned to use the Papercut Patterns Clover Blouse for the top, but after two muslins I was unhappy with the fit. I think that I was being too fussy, and the main problem was just that with my bust the Clover Blouse requires something drapier. I’m planning to give Clover another go with a rayon and lace soon. I then considered using the Grainline Studio Scout Tee, but I had my heart set on trying out a split sleeve detail (inspired by a RTW top I have and love), and it wouldn’t work with set in sleeves. Kimono sleeves, however, are perfect for this detail, and that’s how I decided to use the Staple Dress for the top.

IMG_0316

The armhole is too big… when I hold my arms out, you can look right up it and see my bra!

Honestly, I should have skipped the split sleeves and used the Scout Tee instead, and I’m really kicking myself that I didn’t. The double gauze just isn’t drapey enough and the split sticks out awkwardly when I slouch. I’m keen to try split sleeves again, but I’d only do it in rayon.

I’m not super happy with the fit of the Staple Dress- the neckline and upper chest gape a lot, and just don’t sit nicely. This is a problem which I have with my two previously made Staple Dresses (Sen Ritsu and Mountain View) as well. Given the fit problems, this wasn’t a well thought out pattern choice… I guess I assumed the problem would just magically go away. Imagine my sarcastic shock when it didn’t. Vigorous eye-rolling ensued.

Right or wrong (plenty of wrong), here’s how I did things. I cut the Staple Dress pattern off roughly at the waist, using my traced and altered pattern pieces from previous Staples. I swore profusely when I noticed I’d somehow managed to cut two backs, then calmed down somewhat when I realised it was an easy fix because the only difference between the front and the back was the neckline (no wonder it doesn’t work well on my shape!).

IMG_0960

Two backs….ruh roh. They look like different sizes but it’s just the angle.

To make the split sleeve, I removed the seam allowance along the shoulder seams, and bound each shoulder seam separately with exposed self bias tape. I then sewed up the bodice side seams, and bound the neckline and sleeve hems with more exposed self bias tape, with the bound shoulders zigzagged up against each other, so that the neck and hem bindings held them together. I’m now thinking that I probably didn’t remove any seam allowance at the neck to account for the exposed bias finish, and maybe that could be contributing to the gaping neckline? I don’t remember, and unfortunately an unplanned phone sync wiped all my notes.

IMG_0961

Neck and Sleeve binding in progress

With the bodice done, I assembled the Brumby Skirt (size XL) according to directions, but cut the back piece on the fold to omit the seam and zipper, and left out the waistband. I closed the side seams, then gathered the skirt directly to the bodice. I used shirring for the gathering– it’s my favourite way to do it, so much easier and quicker than the normal thread pulling method! I just did a line of shirring on either side of the seam allowance,  stretched and pinned the skirt to the bodice, stitched them together, then removed the shirring. This skips the drama of gathering the skirt to the exact right length, and it ensures that the gathers are even.

I was originally planning to elasticize the waistline, but when I tried the dress on, I had second thoughts. The sack shape doesn’t look so great on me, but it feels so free… and it’s a very Japanese silhouette, which seems to go well with the Japanese fabric. I asked for advice on instagram and most people suggested I just leave it loose, so I figured I would follow that advice, and try out this new look, at least for a while.

IMG_0319

The pic I used for my little instagram poll

My feelings about this dress are mixed– the neckline gaping, and the way the split sleeves stick out as I move/slouch, really bug me. The lack of waistline definition feels unflattering, and the bodice feels far too wide. It doesn’t sit nicely around the underarms, and I feel like maybe I need to take it in. Yet despite all these complaints, I haven’t done anything about it- partly because I’m not sure exactly what to do, and partly because it just feels so good. Because it’s oversized and unfitted, It’s super comfortable, and I feel like the fabric (which I love) is interesting enough to compensate somewhat for the unattractive shape. I particularly enjoyed wearing it with leggings on the long plane trip to Australia over Christmas. I made this dress nearly two months ago, and although I’m not sure I really like it, it’s actually gotten quite a lot of wear.

  IMG_0805-0
I’ll to continue to think about about how I might be able to improve it (Elasticising the waist, re-doing the neckline, taking in the sides, stitching closed the split? Suggestions welcome!), and deliberating whether it would even be worth it. Perhaps it’s good for me to have one sack dress, for those days when a waistline is just too much of a struggle. I actually kind of want to make another loose (but not SO loose!) waistline dress, this time using rayon, and either combining the Scout Tee and Brumby Skirt, or a Southport Dress bodice and a simple gathered rectangle skirt, patch pockets, and waist ties.

In the meantime, however, I’ll keep wearing and enjoying this one!


Mountain Views Southport Crop Top


Hiking in the Royal National Park

New year, same old apologies for negligent blogging…let’s just skip over those, shall we? With 73 days since the last post (and a year and a day since my first!) it’s a good thing I have no ill-conceived ambitions to achieve sewing blogger stardom.

Speaking of the new year, this not particularly recent make ties in with my New Year’s Resolution. I know, I know– as soon as you call something a New Year’s Resolution, you’re basically instantly condemning it to failure. My own track record for resolutions is abysmal. But I’ve been thinking– maybe my resolutions always fail, because they’re always exactly the same. Doesn’t the old saying go that the definition of insanity is doing the same thing and expecting different results?

Every year, for as long as I can remember, my resolution is some variation of that same tired old cliche– lose weight. Lose weight, because then everything will be better. It’s pretty clear that this hasn’t been effective.

So this year, inspired by this wonderful article from Cashmerette, I’m trying a different tack. Clearly, my vain attempts to hate myself thinner haven’t been effective– and anyways, since I’ve started sewing, I’ve found the fervour of my self loathing gradually diminishing. For 2016, my New Year’s Resolution is to (at least try to) stop letting insecurity hold me back.

I’m starting to think that my body isn’t as problematic as how I feel about my body. Social anxiety. Avoiding yoga classes for fear of judgement, and reluctance to run because of all the public jiggling that it entails (I know feeling like I’m too fat for exercise is ridiculously counterproductive, but there it is). Worrying that I’ll be mocked for flirting, and hesitating to wear what I really want to wear. Those are products of my mentality more than of my weight, and they’re not helping me lose weight but they ARE getting in the way of feeling happy. I don’t judge other larger women harshly, so why do I do it to myself?  Enough!

I’ll be honest, I’d still like to lose weight. I can’t pretend that society’s general disapprobation of my body doesn’t bother me at all. More importantly,  I don’t feel as healthy or strong as I have in the past, when I was a bit slimmer. However, I’m thinking that I don’t need to hate myself in the meantime, and that weight loss isn’t the only or even most important goal to fixate on.

Sewing has been such an important part of my improving relationship with my body. Being able to make and wear nice clothes which express who I am, which make me feel good, has been huge for me. I’m no longer  forced to subject myself to the shame-filled search for decent clothes, or the humiliation of sometimes not fitting the largest size in the store. I’m also able to experiment with new looks, and wear things that “girls like me aren’t supposed to wear”. One of those things is the crop top.


By Karloo Pools

I’ve been thinking for a while now that the high waisted skirt and crop top look can be really cute on chubby girls. This post by Cashmerette (yes, total blog crush) further sold me on it. So, I decided to give it a go for myself.

I made this top out of the True Bias Southport Dress pattern, with the same adjustments (including fba and added darts) as my two  Southport dresses. All I did was leave off the skirt and drawstring casing, and narrow hem the raw edge. A super simple make, barely squeezed out of some precious fabric leftover from my Staple Dress. The fabric is Mountain Views double gauze by Nani Iro, quite possibly my favourite fabric ever.

So far, I’ve been wearing this top with my denim Megan Nielsen Brumby Skirt— on its own here in Sydney where I’m visiting for Christmas, or with a navy cardigan, tights and boots back in Korea. I’ll admit, I don’t feel entirely comfortable in it. Although you can’t see any midriff in these pictures, it does flash skin as I move. However, at the same time, it feels cool and breezy and strangely liberating. I plan to keep wearing it, regardless of my fears of what strangers (or even some of my judgier friends) are thinking. It fits in well with my resolution, and each time I wear it, it gets easier.

To anyone reading– are there any styles which “people like you” aren’t “supposed” to wear, but you’re secretly wishing to try? It’s a new year– maybe it’s time to be bold and try them out!


On the boat, my last day in Sydney before heading back to Korea!


Denim Brumby

Megan Nielsen Patters Brumby Skirt

Didn’t notice that my top was twisted and showing a strap on my swimmers… oops!

I find it really hard to get excited about sewing basics. With my love of colorful prints, the idea of sewing a plain denim skirt feels excessively dull. However, my love of colorful prints is a bit problematic for my goal of an entirely me-made wardrobe…I’m definitely not cool enough to pull off the clashing prints look, so I need to occasionally suck it up and sew some basic, versatile separates. That’s exactly what I did here, and it wasn’t nearly as dull as I’d feared. Somehow this plain denim skirt turned out to be really satisfying!

It probably helps that the pattern itself isn’t all that plain. It’s version 1 of the Brumby Skirt by Megan Nielsen Patterns. It’s a gathered skirt with large curved hip pockets, a wide waistband, and top stitching. I particularly love the pockets. I think they make the skirt interesting despite the ultra-boring fabric, a mid-weight medium-colored mystery denim from Dongdaemun Market in Seoul. I can’t wait to make another Brumby, I’m thinking I’ll use a Liberty Lawn that I’ve been hoarding for a while.

denim Megan Nielsen Brumby Skirt

Top AND skirt are twisted… sigh. One day I’ll get this whole photo-taking thing right!

Size-wise, I had to make some adjustments… Which brings me to my only gripe about Megan Nielsen Patterns. My waist is currently about 35 inches. This puts me at the second biggest size for By Hand London and Grainline Studio, and between the third and second biggest (standard) sizes for Colette. For Sewaholic, I’m the biggest of their old sizes, but they’re releasing their new patterns with two sizes which are bigger than that. I am well aware that I am at the upper end of the size chart for most indie patterns… But For Megan Nielsen Patterns, I don’t even fit on the chart! Their biggest size, XL, is for a 34″ waist. I don’t know why their size range is more limited than some other major indie brands, but I think it’s a shame. These are beautifully designed, beautifully packaged, and great quality patterns. Given that so many sew-ers are on the plump side (dissatisfaction with RTW patterns is what drives a lot of us to sew in the first place!), I imagine there are a lot of ladies out there who would love to use these patterns, given the chance!

Denim Megan Nielsen Brumby Skirt

Feeling good about my new skirt, in my classroom at school. Forgive the rumpled hem, I’d been sitting on it all day!

Very fortunately for me, my waist is only a little bigger than the XL measurement, and my hips are actually a little smaller. This means that it was no problem getting the Brumby skirt to work for me. As it’s a gathered skirt, all I had to do was sew the waistband with a smaller side seam allowance. By using a 1/4 inch seam allowance here rather than 5/8, I got that extra inch I needed. I also sewed the skirt side seams with a 1/2 inch allowance, although that wasn’t really necessary. I own a copy of the Tania Culottes pattern, and I’m really looking forward to making them. I’m expecting that I’ll be able to get around the size issue in the same way.

Construction went smoothly, for the most part. I used the new Megan Nielsen Patterns App, and it was so handy! I don’t think I even looked at the printed instructions. As there are three different variations, the app made it super quick to locate the information I needed.

The only hitches came with the invisible zipper. On the app, for Step 6 for the zipper, it shows the wrong side of the fabric where it should show the right side– that messed with my head! I looked it up online and figured it out. I ended up top stitching the zipper down, rather than do it according to the instructions, because it was easier and faster.

The other problem with the zipper is that it ended up being way too low! I think I gathered too close to the seam, and so my measurements were off. But also, it says to mark out a 10″ box for the zipper… But with a 9″ zipper and a 5/8″ seam allowance on the waistband, doesn’t that leave it 3/8″ too short? It’s not a problem I’ve seen others mention, so I guess there must be something I’m not understanding, but I can’t figure it out.


So for whatever reasons, my zipper came up way too short. Because inserting it involved a cut, I couldn’t just rip it out and sew it higher. What to do? Well, I remembered seeing someone making a tab to cover this same problem. Unfortunately I can’t remember where I saw it, or whether it was also a Brumby skirt. It seemed like a good idea, so I did the same. It’s stitched down on one side of the zipper, and on the other it attaches with sew-in snaps. I’m just going to pretend it’s not there to cover a stuff up, and call it a design feature. Saved!

Improvised solution to my problematic zipper insertion

It was my first time doing contrast topstitching. I used a caramel colored topstitching thread, it’s like the classic denim topstitching color. I feel like it gives the skirt a really finished look… As long as you don’t look too closely at my wonky stitches! My seam ripper definitely got some action there.

For hemming, I turned it up 1.5″ instead of 2.5″, and this ended up being the perfect length for me. I’m only a bit under 5’3, so if you’re much taller, it might be a little short if you follow the directions (depending on your inclinations!). Personally, I’m certainly not one to avoid showing a bit of skin, but I wanted it to be something I’m comfortable wearing to work. I’m an elementary school ESL teacher, and I definitely don’t want to be giving the kiddies a flash of my undies whenever I bend over a desk!


I rather frantically finished this skirt just in time to take it on a trip. Literally completed 25 minutes before I had to run out the door, and I hadn’t packed yet. It was a scramble, but worth it. My friend and I went to a Korean island called Ulleungdo. It’s a pain to get to, but absolutely gorgeous, and we had a lovely time. I enjoyed wearing my new skirt there, It’s always nice having something new to wear on vacation!

Hiking on Ulleungdo , and island in the East Sea of South Korea

One of the ports on Ulleungdo. The main business here is squid, those are all squid boats. At night, you can see their lights out at sea.

Swaying Palms Market Tote

Tommy Bahama swaying palms market tote
I never thought I’d get excited about a tote bag, but this project has turned out to be one of my most satisfying makes so far.

Near our family holiday house in Cazadero, California

I had a great time in California at the end of July/early August, when I visited my parents at our holiday house in the Sonoma County Redwood forest. I spent two weeks picking wild blackberries, lazing by the creek, sightseeing with my parents, and drinking (guzzling?) local Russian River Valley wines. All of the wining and dining was generously sponsored by my parents, so I wanted to make them something to say thanks.

I’ve seen the main fabric around the internet a couple times, and from the first time  I saw it I immediately thought of them. I was so happy to hunt it down, because I think they’ll love it. I knew I wanted to make them a bag with it, but it took me a long time to settle on a pattern. I wanted something useful and fairly gender neutral (my mother isn’t very feminine, and my father definitely isn’t a macho type either). I wanted to make a bag that they could pack a picnic in, or take to the hotel pool when they’re travelling. My first preference was to buy a pattern (save me having to measure stuff out myself) but ultimately I couldn’t find anything that seemed right.

Eventually, I stumbled upon this tutorial. It wasn’t everything I was looking for, but it was pretty close, and the instructions were really good. I used this as a jumping off point, and modified it to get what I wanted.

Construction in progress.

The base and main body dimensions are the same as the tutorial. The most obvious deviation from the original is that I cut the straps 12 inches longer (but 11 might have been better) and sandwiched them between the base and the main body, rather than the main body and the lining. I stitched along the straps up the body to secure them, stopping 1 1/2 inches from the top. 

Then, once the lining was attached and the whole thing was turned out the right way, I stitched a 1″ box with an X through each strap to secure it. In both this stitching, and the top stitching along the edge of the bag, I used white thread in the bobbin to match the lining and make the stitching less obvious on the inside.

Inside of the bag, with the pocket and label sewn into the lining.

Another change I made was to add an interior zipped pocket, according to this tutorial, on one of the lining pieces (before assembling the lining). I stitched the pocket to the lining for extra strength, using matching thread.

I also added one of my new custom labels. I ordered them from Nominette after reading a review on a sewing blog. I don’t remember which blog it was now, although I’ve since seen them reviewed on another blog or two. Good marketing. For what it’s worth, I’m very happy with them– although they’re a little more plasticky-feeling than I’d hoped, I still think they’d be comfortable in garments (hopefully I’ll test this out soon!). I paid €44.50 for 100 woven labels (this is the minimum order), including shipping to Korea, and they were mailed out really quickly. There’s a pricier custom logo option, but these are just the basic ones.

IMG_2041

Nothing I make can go in the dryer. I don’t own one, so nothing has been pre-shrunk. It’s for the best anyways– kinder to the clothes, and the environment!

Once I’d drawn up all the pattern pieces, and figured out what I was doing, the construction of this bag went very smoothly. I zigzagged all the raw edges, and skipped the interfacing, because the tutorial was made for quilting cottons. With the fabrics I used, extra strength wasn’t necessary. Interfacing would have given the bag more structure, but I like the soft-and-floppiness of this bag. Makes it easier to shove it into other bags when travelling. I tried adding a line of stitching on the inside to give the base sharper edges– you can see this on the picture below– but with the floppiness, it didn’t really have much effect, and I’ll skip it next time. 

Here you can faintly see the chalk from when I marked the stitch lines on the straps– it’s been rubbed off now and isn’t visible.

I deliberated over whether I wanted to use green or brown for the base, and ordered both out of indecision. The helpful advice I got on Instagram and from friends was to use the green. I eventually decided to cut the straps out of the brown fabric– I’m extremely pleased with how this worked out.

Here are the fabrics I used:

Base: 7 oz. cotton duck, hunter green. From fabric.com, available here.

Main: Tommy Bahama Swaying Palms Aloe polyester home dec fabric, from fabric.com, available here.

Straps: Pre-shrunk 9 oz. cotton duck, potting soil brown. From fabric.com, available here.

Lining and pocket: Unbleached cotton from Dongdaemun market in Seoul. It’s thicker and tougher than a quilting cotton, I think it might be a lightweight canvas?

The main, base and strap fabrics all advised against washing in the care instructions, so I didn’t pre-wash them. However, when I went to iron the green base fabric, it yellowed where I sprayed it with water, and seemed to smoke under the iron. This worried me, because a tote bag which can’t get wet would be a silly thing indeed, and it needed to be ironed before cutting. So, I soaked the fabric in some water, and hung it up to dry. This left it rather wrinkled, but also made it feel a lot more cotton-y. Prior to this, it had actually felt rather synthetic. I prefer the less smooth, more natural look it has now. It also no longer smoked under the iron after this soaking– wonder if it had been treated with something? Either way, although the instructions said dry clean only, soaking it changed it but didn’t ruin it.

IMG_2076

The bag on an outing, with my most recent Southport dress.

I will finish up here with a confession: I love this bag so much, that after taking it for a test drive, I claimed it for myself. I’d originally thought I wouldn’t want it, because the fabric isn’t typically my style, but it’s really grown on me. However, lest I seem excessively selfish, I do have some excuses for taking this one as mine. There was enough fabric left over for an identical bag, and that bag is now almost done. I’d hoped that the second go round there would be fewer flaws, and so far it does seem better. Hopefully my parents’ bag will be on its way to them soon– in the meantime, I am thoroughly enjoying mine. I’ve used it almost every day since it was made!

The bag in action. Child for scale.

Volcanism Southport

True Bias Southport dresses in Liberty Tana Lawn

My first and second Southport dresses

I made this True Bias Southport dress immediately after I made the last one. All the  (intentional) modifications are the same, except that I created a narrower hem to add more length (I had shortened the pattern 1″). This time, I turned it up 1/4″ and then 1/4″ again. This makes it just 1/4″ shorter than the pattern as drafted. Honestly, I shouldn’t have shortened the pattern…If you’re tall, you may even want to consider adding length! This time, I managed to french seam the bodice correctly without messing it up.
Like my last Southport, the fabric is Liberty Tana Lawn. It’s such a great fabric for this pattern. The print is called Volcanism, and I ordered it from Shaukat at the same time as the Matt Madison print from that last one. I ordered 3 meters of Matt Madison, and 2 meters of Volcanism, because I thought I would like the former better. Wrong. I do like the Matt Maddison, but I absolutely LOVE the Volcanism print. Purples and blues with a gentle splash of yellow– it’s perfect for me and completely my style. Fortunately, because of the wide width I managed to squeeze this dress out of less than 120 cm of fabric, so I have enough fabric left over for a top of some sort. Shaukat is sold out of this fabric, but it has the same print in a different colorway, if you’re interested.

LIberty Tana Lawn Volcanism

A closeup on the Volcanism Liberty print

Speaking of fabric usage, I had a bit of a head scratching moment when cutting this out. By tracing off the bodice pieces so that they are full sized (rather half-sized pieces cut on the fold), I managed to squeeze them in side-by-side on the past Southport. Only barely, but still. Then, when I laid out the pattern pieces on this one, I was pretty perplexed to find that they didn’t fit. How could this be?
Well, I hadn’t ironed the fabric yet. The fabric didn’t look very wrinkled at all, so I was going to be naughty and skip that step. However, it turned out that ironing was key– once that was done, the pieces fit.  That was a relief, because I really wanted to save as much fabric as possible. I’ve learned my lesson– always iron the fabric before cutting, even if it doesn’t seem like it will make much difference.

Before and after ironing. In the bottom picture, you can see that the two bodice pieces fit alongside each other after ironing, but with no room to spare!

I also managed to squeeze in the skirt pieces alongside each other, like last time, by folding the selvedges in towards the center to create two folds.

The pockets are cut from a light navy blue cotton, and the armholes, neckline, and drawstring are done with navy blue bias tape. I really need to just suck it up and make my own bias tape, because this store bought stuff is a bit too stiff for the lawn.

Excuse the wrinkles, I’d been wearing it all day. This is its natural, unpressed state!

After wearing this and my previous Southport a lot, there are just two little fitting issues I’ve noticed– the bust darts are a little high, and the bodice is a bit too short at the front. These are minor problems. My Volcanism Southport has  become the most worn item in my closet– at least of the clothes which aren’t work appropriate. It’s the perfect casual warm-weather dress.

Blue Hazel Kim 

By Hand London Kim Dress bodice with a Colette Patterns Hazel Dress skirt
Usually, I title my projects with the fabric name and pattern name. However, this most recent dress was made from an anonymous quilting cotton. I picked it up months ago at a huge warehouse-like quilting fabric store called “Happy Quilts”, in Pyeongtaek, a city nearby. It cost me just $4 a meter, so it was perfect to use in this dress, which is sort of a wearable muslin (after multiple unwearable muslins in plain white cotton). I don’t have a name for the fabric, so I’ll just go with “Blue”. So descriptive. I think the picture below of the bodice in progress most accurately shows the color/print. It seems to be Australian Aboriginal inspired.


For the pattern, I used the sweetheart variation of the bodice of By Hand London’s Kim dress, and the skirt from Colette Patterns’ Hazel dress. I used the Hazel skirt simply because I’d run out of tracing material, so I couldn’t trace off my size in the BHL Kim skirt. I wasn’t patient enough to wait for my tracing material in the mail (I have to order it from America, because I haven’t figured out how to get it in Korea… Ugh.). I’ve made four Hazel dresses before, so I know the skirt works for me, and since it’s just a simple gathered skirt, I knew it would work here.

By Hand London Kim Dress bodice with a Colette Patterns Hazel Dress skirt

Oops, wish someone had told me my zipper was a little undone… I should start doing the hook-and-eye thing, but they seem like such an effort to do up on my own!

I started the Kim dress months ago, but due to fitting problems, I put it aside for a while. I’m so glad I decided to re-tackle it– there are a few small problems still, but most shouldn’t be too hard to fix. I’m overall VERY happy with my finished result! With the close bodice fit and full bodice lining, this is the most technically advanced thing I’ve ever made. Plus, I’m totally obsessed with sweetheart necklines… I’ve definitely got more Kim dresses on my horizon.

As per the pattern instructions, I chose my base size according to my waist measurement (35″). This put me in a U.S. size 14. I then gathered my courage and tackled my first ever princess seam FBA. The bust measurement for my size is 42″, but my bust is 46″ so I needed to add 4″ total with a 2″ FBA.

However, when I slashed and spread by 2″ the pattern pieces looked super bizarre… So I convinced myself that a less dramatic 1″ fba would magically be fine. To my delight, in the single-layered rough muslin I made, it seemed ok! I then forged ahead and cut out a bodice in this blue fabric, and made it up, fully lined. Unsurprisingly, it was a total disaster… Puffy nips sitting high above my actual bust point, lower half of my boobs totally compressed. Not a great look. I had ignored the fact that a single layer of cotton is going to stretch more than the final lined bodice… Rookie mistake.

About two months later I gave it another go with a bigger fba. Here’s how I came to the result you see here:

  • I womanned up and did a 2″ FBA (total of 4″ added to bodice)
  • I sewed the neckline seam with a narrower seam allowance, 3/8 I think, because I’d read about other people finding the neckline rather low and doing this to compensate. Good call. Anyone who knows me can tell you I’m not one to lock up my bust in the cage of a modestly high neckline when I can avoid it… However, even for me, the neckline is a bit low! I’ll probably do a 1/4″ seam allowance next time.
  • I lengthened the side and center back pieces by 8 mm, because in my muslin they were coming up shorter than the side front. This was probably FBA-related.

As for the skirt, it’s just the size 16 from the Hazel pattern. Because I’m only 5’2.5 It’s been shortened– by 2″ maybe? I don’t remember.

In addition to sewing the neckline with a smaller seam allowance, there are a few things to fix for a better fit next time:

  • The bodice is definitely a touch too long at the front (which explains those creases you can maybe see on my belly), so I’ll shorten it a bit there.
  • The straps are possibly a touch too long/not angled correctly, because they were slipping off my shoulders a lot. I’ll probably trim the top of the back strap.
  • There is some puckering along the princess seam. I think the 5/8″ seam allowance is just too wide to smoothly ease the dramatic curve in the bodice side front caused by my FBA to the less curved center front. I’m going to trim off 3/8″ of the seam allowance on the princess seam line of both pattern pieces, measure to check it’ll still line up, and sew it with a 1/4″ seam allowance instead. I’ll see how that goes, but theoretically it should help.
  • Finally, while the dress fits perfectly at my waist and bust, there is some excess fabric in between. This is the most difficult problem to solve, and I’m debating whether it’s worth trying. Basically, the princess seam doesn’t seem to curve in enough under the bust– it’s too smooth a line from apex to waist. Maybe you can see what I mean in this picture of my pattern piece:


To get a closer fit I think I’d have to redraw it, and I’m worried how well I would do… I think I’d just as likely make it worse! So I’d have to try it out with another muslin. I’m not sure if that’s too much hassle for a rather minor issue.

 By Hand London Kim Dress bodice with a Colette Patterns Hazel Dress skirt

Anyways, all in all, I am totally enamored of my new Hazel/Kim lovechild, and the BHL Kim pattern in general. I've been really wanting something a bit ... sexier? ... than the dresses I've made so far, and the princess seams and sweetheart neckline have really given me the look I was going for. I now want to make everything with princess seams!  The out-and-about pictures I've posted here are from a recent day out in the city of Jeonju, South Korea, with a group of friends. The city has a lovely historic district, it made for a nice day!Anyways, I am totally enamored of my new Hazel/Kim lovechild, and the BHL Kim pattern in general. I wanted something a bit… sexier?… than the dresses I’ve made so far, and the princess seams and sweetheart neckline  give me the look I was going for. I now want to make everything with princess seams!

The pictures I’ve posted here are from a recent day out in the city of Jeonju, South Korea, with some friends. The city has a lovely historic district, it made for a nice day!

Jeonju, South Korea