Sound Circle Staple Brumby

Megan Nielsen Brumby skirt and April Rhodes Staple dress hack

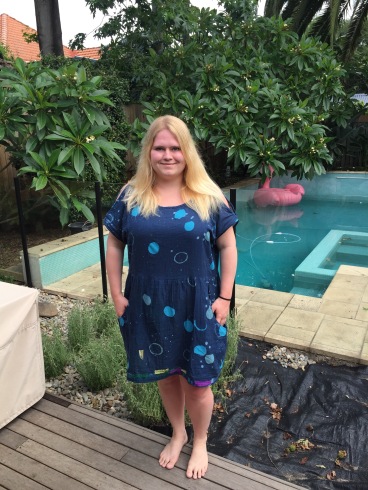
Took these pictures while visiting home in Sydney…now back in freezing Korea, and dreaming of sunnier times!

This dress is a mix of the April Rhodes Staple Dress and the Megan Nielsen Brumby Skirt. I made it from Nani Iro double gauze (the print name is “Sound Circle”) which I bought from my favourite online fabric store, Miss Matatabi.

I absolutely love the Brumby Skirt (those pockets!), and I’ve been wanting to use it in a dress. Originally, I had planned to use the Papercut Patterns Clover Blouse for the top, but after two muslins I was unhappy with the fit. I think that I was being too fussy, and the main problem was just that with my bust the Clover Blouse requires something drapier. I’m planning to give Clover another go with a rayon and lace soon. I then considered using the Grainline Studio Scout Tee, but I had my heart set on trying out a split sleeve detail (inspired by a RTW top I have and love), and it wouldn’t work with set in sleeves. Kimono sleeves, however, are perfect for this detail, and that’s how I decided to use the Staple Dress for the top.

IMG_0316

The armhole is too big… when I hold my arms out, you can look right up it and see my bra!

Honestly, I should have skipped the split sleeves and used the Scout Tee instead, and I’m really kicking myself that I didn’t. The double gauze just isn’t drapey enough and the split sticks out awkwardly when I slouch. I’m keen to try split sleeves again, but I’d only do it in rayon.

I’m not super happy with the fit of the Staple Dress- the neckline and upper chest gape a lot, and just don’t sit nicely. This is a problem which I have with my two previously made Staple Dresses (Sen Ritsu and Mountain View) as well. Given the fit problems, this wasn’t a well thought out pattern choice… I guess I assumed the problem would just magically go away. Imagine my sarcastic shock when it didn’t. Vigorous eye-rolling ensued.

Right or wrong (plenty of wrong), here’s how I did things. I cut the Staple Dress pattern off roughly at the waist, using my traced and altered pattern pieces from previous Staples. I swore profusely when I noticed I’d somehow managed to cut two backs, then calmed down somewhat when I realised it was an easy fix because the only difference between the front and the back was the neckline (no wonder it doesn’t work well on my shape!).

IMG_0960

Two backs….ruh roh. They look like different sizes but it’s just the angle.

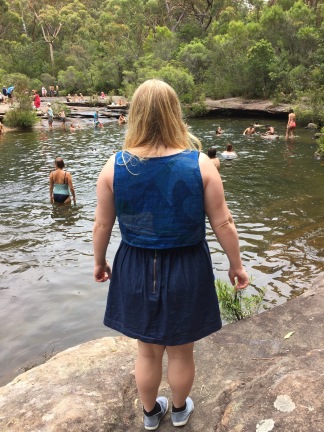
To make the split sleeve, I removed the seam allowance along the shoulder seams, and bound each shoulder seam separately with exposed self bias tape. I then sewed up the bodice side seams, and bound the neckline and sleeve hems with more exposed self bias tape, with the bound shoulders zigzagged up against each other, so that the neck and hem bindings held them together. I’m now thinking that I probably didn’t remove any seam allowance at the neck to account for the exposed bias finish, and maybe that could be contributing to the gaping neckline? I don’t remember, and unfortunately an unplanned phone sync wiped all my notes.

IMG_0961

Neck and Sleeve binding in progress

With the bodice done, I assembled the Brumby Skirt (size XL) according to directions, but cut the back piece on the fold to omit the seam and zipper, and left out the waistband. I closed the side seams, then gathered the skirt directly to the bodice. I used shirring for the gathering– it’s my favourite way to do it, so much easier and quicker than the normal thread pulling method! I just did a line of shirring on either side of the seam allowance,  stretched and pinned the skirt to the bodice, stitched them together, then removed the shirring. This skips the drama of gathering the skirt to the exact right length, and it ensures that the gathers are even.

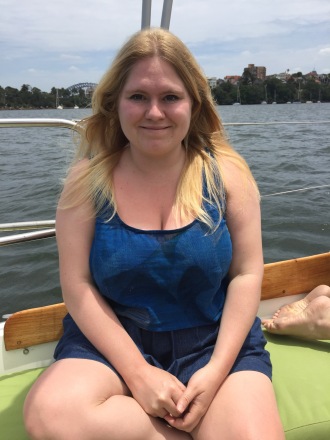
I was originally planning to elasticize the waistline, but when I tried the dress on, I had second thoughts. The sack shape doesn’t look so great on me, but it feels so free… and it’s a very Japanese silhouette, which seems to go well with the Japanese fabric. I asked for advice on instagram and most people suggested I just leave it loose, so I figured I would follow that advice, and try out this new look, at least for a while.

IMG_0319

The pic I used for my little instagram poll

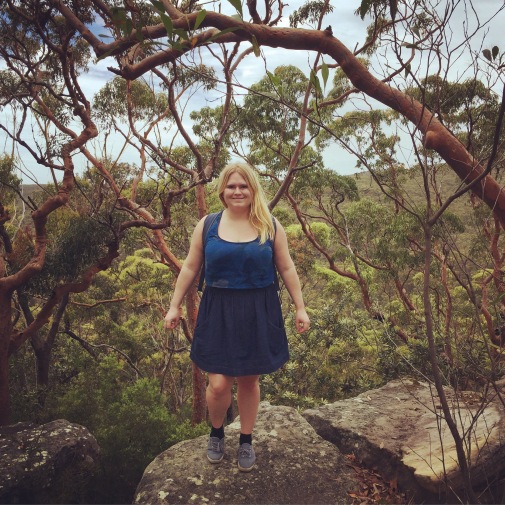
My feelings about this dress are mixed– the neckline gaping, and the way the split sleeves stick out as I move/slouch, really bug me. The lack of waistline definition feels unflattering, and the bodice feels far too wide. It doesn’t sit nicely around the underarms, and I feel like maybe I need to take it in. Yet despite all these complaints, I haven’t done anything about it- partly because I’m not sure exactly what to do, and partly because it just feels so good. Because it’s oversized and unfitted, It’s super comfortable, and I feel like the fabric (which I love) is interesting enough to compensate somewhat for the unattractive shape. I particularly enjoyed wearing it with leggings on the long plane trip to Australia over Christmas. I made this dress nearly two months ago, and although I’m not sure I really like it, it’s actually gotten quite a lot of wear.

  IMG_0805-0
I’ll to continue to think about about how I might be able to improve it (Elasticising the waist, re-doing the neckline, taking in the sides, stitching closed the split? Suggestions welcome!), and deliberating whether it would even be worth it. Perhaps it’s good for me to have one sack dress, for those days when a waistline is just too much of a struggle. I actually kind of want to make another loose (but not SO loose!) waistline dress, this time using rayon, and either combining the Scout Tee and Brumby Skirt, or a Southport Dress bodice and a simple gathered rectangle skirt, patch pockets, and waist ties.

In the meantime, however, I’ll keep wearing and enjoying this one!


Mountain Views Southport Crop Top


Hiking in the Royal National Park

New year, same old apologies for negligent blogging…let’s just skip over those, shall we? With 73 days since the last post (and a year and a day since my first!) it’s a good thing I have no ill-conceived ambitions to achieve sewing blogger stardom.

Speaking of the new year, this not particularly recent make ties in with my New Year’s Resolution. I know, I know– as soon as you call something a New Year’s Resolution, you’re basically instantly condemning it to failure. My own track record for resolutions is abysmal. But I’ve been thinking– maybe my resolutions always fail, because they’re always exactly the same. Doesn’t the old saying go that the definition of insanity is doing the same thing and expecting different results?

Every year, for as long as I can remember, my resolution is some variation of that same tired old cliche– lose weight. Lose weight, because then everything will be better. It’s pretty clear that this hasn’t been effective.

So this year, inspired by this wonderful article from Cashmerette, I’m trying a different tack. Clearly, my vain attempts to hate myself thinner haven’t been effective– and anyways, since I’ve started sewing, I’ve found the fervour of my self loathing gradually diminishing. For 2016, my New Year’s Resolution is to (at least try to) stop letting insecurity hold me back.

I’m starting to think that my body isn’t as problematic as how I feel about my body. Social anxiety. Avoiding yoga classes for fear of judgement, and reluctance to run because of all the public jiggling that it entails (I know feeling like I’m too fat for exercise is ridiculously counterproductive, but there it is). Worrying that I’ll be mocked for flirting, and hesitating to wear what I really want to wear. Those are products of my mentality more than of my weight, and they’re not helping me lose weight but they ARE getting in the way of feeling happy. I don’t judge other larger women harshly, so why do I do it to myself?  Enough!

I’ll be honest, I’d still like to lose weight. I can’t pretend that society’s general disapprobation of my body doesn’t bother me at all. More importantly,  I don’t feel as healthy or strong as I have in the past, when I was a bit slimmer. However, I’m thinking that I don’t need to hate myself in the meantime, and that weight loss isn’t the only or even most important goal to fixate on.

Sewing has been such an important part of my improving relationship with my body. Being able to make and wear nice clothes which express who I am, which make me feel good, has been huge for me. I’m no longer  forced to subject myself to the shame-filled search for decent clothes, or the humiliation of sometimes not fitting the largest size in the store. I’m also able to experiment with new looks, and wear things that “girls like me aren’t supposed to wear”. One of those things is the crop top.


By Karloo Pools

I’ve been thinking for a while now that the high waisted skirt and crop top look can be really cute on chubby girls. This post by Cashmerette (yes, total blog crush) further sold me on it. So, I decided to give it a go for myself.

I made this top out of the True Bias Southport Dress pattern, with the same adjustments (including fba and added darts) as my two  Southport dresses. All I did was leave off the skirt and drawstring casing, and narrow hem the raw edge. A super simple make, barely squeezed out of some precious fabric leftover from my Staple Dress. The fabric is Mountain Views double gauze by Nani Iro, quite possibly my favourite fabric ever.

So far, I’ve been wearing this top with my denim Megan Nielsen Brumby Skirt— on its own here in Sydney where I’m visiting for Christmas, or with a navy cardigan, tights and boots back in Korea. I’ll admit, I don’t feel entirely comfortable in it. Although you can’t see any midriff in these pictures, it does flash skin as I move. However, at the same time, it feels cool and breezy and strangely liberating. I plan to keep wearing it, regardless of my fears of what strangers (or even some of my judgier friends) are thinking. It fits in well with my resolution, and each time I wear it, it gets easier.

To anyone reading– are there any styles which “people like you” aren’t “supposed” to wear, but you’re secretly wishing to try? It’s a new year– maybe it’s time to be bold and try them out!


On the boat, my last day in Sydney before heading back to Korea!


Mountain View Staple Dress

mountainviewdress1mountainview3

Yes, another Staple dress. I know pattern repeats are a bit boring, but when you’re really happy with a garment that you’ve just made, and you’ve already gone through the trouble of figuring out pattern adjustments, I feel like it just makes sense to make another one!

At least my very next post won’t be a staple dress (although I won’t promise not to show you another make involving the staple dress pattern soon…).

I didn’t do much different for this dress– it’s just the same as my last staple dress, right down to the same type of fabric (but in a different print). The one change I DID make from the last version is to use plain black quilting cotton for the neck binding (I think the pattern calls it a facing?), as well as the pockets. I did this because I love this fabric so much, I wanted to save as much of it as possible! I think I now (hopefully) have enough left over for a pair of pajama shorts.

black quilting cotton used for the arm/neck bindings and pockets

black quilting cotton used for the arm/neck bindings and pockets

Since it was my second time using this pattern, it mostly went by without a hitch… until I got to the neck binding. Even though I stay stitched, I must have stretched it out somehow when I tried the half-made dress on, because the facing strip was too short! I had to stretch it to make it fit, and it took quite a bit of fiddling to get this right.

So, here’s the most basic info:

Pattern: Staple Dress by April Rhodes

Fabric: Mountain View double gauze by Nani Iro, bought from Miss Matatabi (no longer available from this store in the same color)

Size: XXL at the bust graded to XL at the waist/hips

mountainview4 mountainview8mountainview9

More information in the post for my last staple dress 🙂

mountainview7

Sen Ritsu Staple Dress

IMG_2150IMG_2157

Finally, a new pattern!  After three hazel dresses, it seemed time to try something else… and I’m glad I did.

The pattern is the Staple Dress by April Rhodes, made up in a Nani Iro double gauze. I’m obsessed with Nani Iro fabrics, and this dress is made from one of the two pieces I’ve had set aside for months. I actually bought this fabric with the Staple Dress in mind (after seeing this identical fabric and pattern combination here). I think the simple, relaxed silhouette of the pattern makes them a great match.

Actually, despite buying the pattern– and fabric to use with the pattern– quite a long time ago, I was pretty unconvinced about the staple dress. I didn’t like the puffiness at the sides of the bust which you can see on a lot of peoples’ versions of this dress (including on mine!). I thought maybe I could avoid this by skipping the shirring and just using a belt (Um. Ok. So I was also nervous about shirring.). But when the dress was all but done, and I tried it with a belt, I just wasn’t happy with it. It bunched up under the belt unevenly, and pulled up every time I raised my arms (one of the problems with kimono sleeves!) so that I had to re-tuck it down. Besides, I don’t really like wearing belts– and as I was making this dress with the intention of wearing it at work (I’m a teacher), I wanted it to be really comfortable!

So, I took a breath, bought some shirring elastic, and gave shirring a go. I ended up doing five rows of shirring. Verdict: Although my stitches are kind of wonky, it was no where near as hard as I expected, and it definitely improved my satisfaction with the dress.

IMG_2153

close-up on the waistline shirring

I wasn’t totally in love with this dress– being bigger, for a long time I shied away from attention-grabbing prints, and a style like this is never going to be the most “slimming”– but after finding myself reaching for it several times over the last few weeks as I rushed to get ready for work, I can now say that I’m totally sold on it. I’m getting used to the print (I felt a bit too much like I was wearing art, at first!) and the double gauze is so incredibly snuggly… combine that with the super comfortable shirred waistline, and I feel like I’m wearing a nightgown. In the best way. There’s another one in my near future!

IMG_2151

Here’s some of the important details:

Pattern: Staple Dress by April Rhodes, bought as a printed copy from Stitch 56 (along with a bunch of other patterns), and forwarded on to me by my mother in Australia because they don’t ship to Korea. It would have been way cheaper to buy a PDF, but I HATE cutting and taping those things together!

Fabric: Nani Iro double gauze in 2014 Sen Ritsu, view D. I bought mine from Miss Matatabi. Doesn’t seem to be available at this shop any more, but there are lots of other gorgeous Nani Iro prints!

Size: XXL bust graded to XL at the waist/hips.

Modifications: None, except that I shortened it a bit at hemming (I’m 5’2.5 ish)

Like: Super comfortable and practical (pockets!)

Dislike: Not incredibly flattering, neckline feels a bit big… maybe I should have cut a straight XL with a full bust adjustment? But I didn’t want to mess around with that. I’ll probably just make the next one the same way.

Notes: STAY STITCH! So important to stay stitch the neckline and sleeves of this dress, for any hope of the facings matching them later!

Also, I cut the pockets out of a plain navy blue quilting cotton… the fabric was too gorgeous to waste on something that won’t be seen much. I did cut the facing strips out of the main fabric, however, but I’m not doing that on the next one… without facings and pockets, I think there’d be enough fabric left over for pajama shorts 😀

I’ll leave you with some more awkward pictures (Oh, how I hate having my photo taken!).

IMG_2158IMG_2156IMG_2152

Fin